
Contents
- Contents
- Prerequisites
- Introduction
- Creating A Google Account
- Accessing Your Free Trial
- Exploring the Cloud Console
- Navigating the Resource Hierarchy
- Understanding Billing
- Other Ways to Interact With Google Cloud
- Summary
Prerequisites
- Optional: A basic understanding of cloud computing. See this article.
- Optional: Understanding of the skills required for cloud computing. See this article.
Introduction
Google Cloud Platform (GCP) is a comprehensive suite of cloud computing services offered by Google. GCP was first made available to the public in November 2011, and quickly emerged as a leading player in the cloud computing industry, empowering organizations (and individuals) to harness the potential of the cloud for their own needs by leveraging Google’s global network of data centers.
GCP provides a versatile foundation for building, deploying, and managing applications and services by allowing its users to take advantage of Google’s world leading expertise in Big data analytics, ML and AI, networking and infrastructure. GCP exposes this expertise to its users through through fully managed, easy to use services like BigQuery, Kubernetes Engine, Vertex AI and more.
In this article, we step through the process of getting up and running with GCP. We begin by creating an account and signing up for a free trial of GCP, so that we can experiment with GCP tools and services with $300 of free credit. We then familiarize ourselves with the cloud console, a web based user interface for managing our GCP resources. Next, we’ll examine the GCP resource hierarchy so that we can organize our resources effectively, followed by a look at how to manage billing in the cloud.
We end the article with some alternative ways to interact with GCP so that you can automate tasks such as infrastructure deployment, running scheduled jobs and more.
Creating A Google Account
Before you can start working with GCP, you’ll need to create a google account. Head over to the the google cloud console to get started. If you’ve never used google cloud before, you’ll be greeted with a sign in form. You can sign in to GCP using an existing google account if you have one, or you can create a new account via the create account button at the bottom of the form.

Accessing Your Free Trial
New GCP users can access a free trial which includes $300 of free credit for up to 90 days. This is an ideal way to explore the different tools and services available and will help you decide whether GCP is the right platform for you, without requiring you to spend any of your own money. Google will not charge you while your free trial is active unless you opt to upgrade to a paid account. At the end of your trial, if you choose not to upgrade your account, all of the resources you created will be stopped and you may lose any data that you have stored on the platform.
Users that decide to upgrade to a paid account will continue to have access to some free tier resources after the free trial is over. Free tier resources allow you to use a subset of GCP services for free provided that you stay within a certain quota. You’ll be charged for any usage of free tier resources above the free quota.
Once you’ve signed into GCP, you’ll be asked to confirm your identity by supplying some additional details like your name, address and payment information. You can choose to create either a business or individual account (subject to your country of residence). The type of account you choose will have tax implications and can’t be changed, so make sure you choose the appropriate account type.
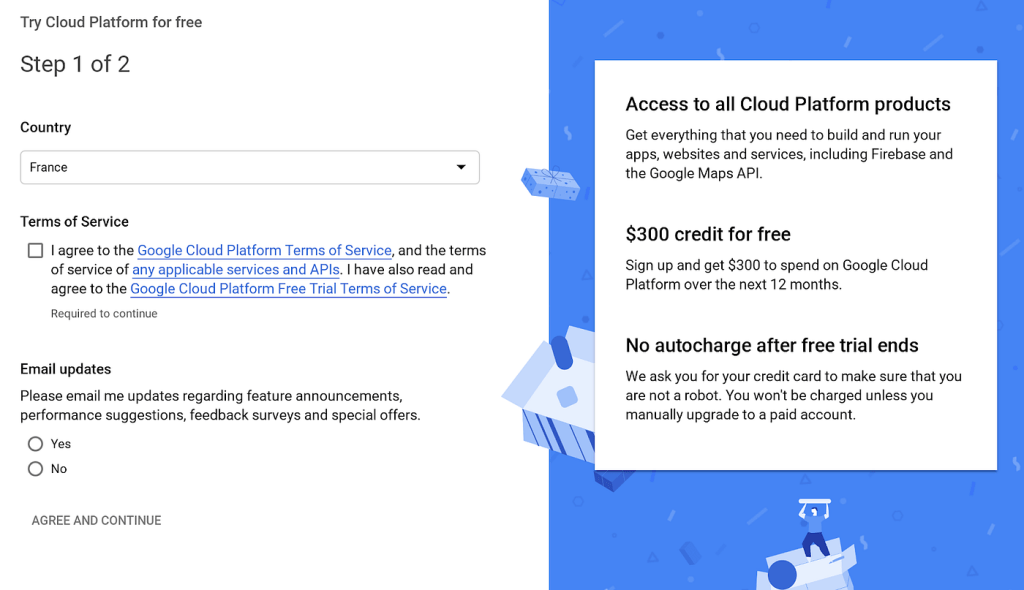
Once you have provided the requested information, your free trial will begin automatically and you’ll be able to begin accessing GCP resources. Note that your payment details are required for identification purposes only. You won’t be charged during the free trial, unless you decide to upgrade to a paid account.
Exploring the Cloud Console
The google cloud console is a browser based UI that you can use to manage your GCP resources. The cloud console is a good place to begin exploring the tools and services that GCP offers. The cloud console can be accessed by navigating to console.cloud.google.com in your web browser.
When you access the cloud console, you’ll be presented with a welcome page. At the top of this page, you’ll notice a toolbar that you can use to navigate GCP. At the far left of the toolbar, you’ll find the navigation menu. Expanding this menu will allow you to explore all the products that GCP has to offer. Products in this menu are organized into categories of related products, such as compute, storage, networking and analytics. Clicking an entry in the menu will open an explorer page for the relevant product. From here, you can perform most tasks associated with the selected product, such as creating, modifying or deleting resources associated with the product.
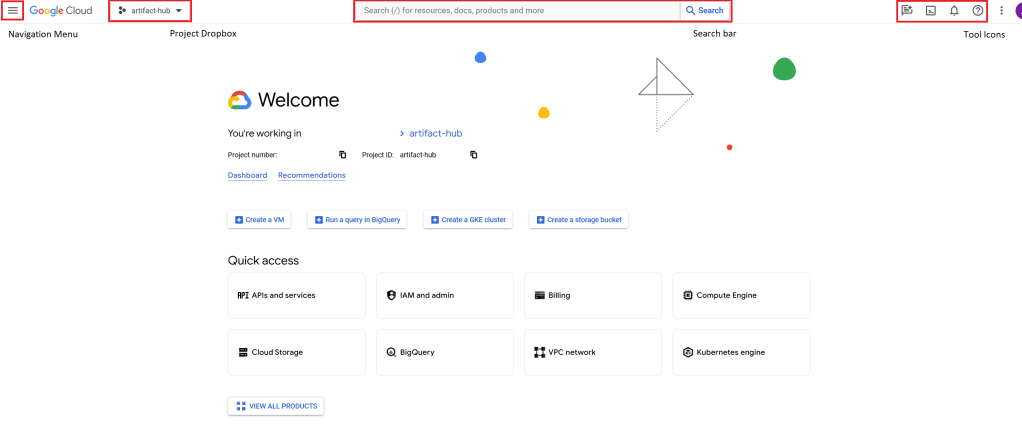
In the center of the toolbar you can find a search box. You can use the search box to find products, documentation or ready to deploy solutions from the GCP marketplace, related to your search keywords.
To the right of the toolbar, you’ll find some icons for helpful resources. The left-most icon will open Duet AI, a generative AI tool to help with development tasks on GCP. Duet AI is currently in preview mode and requires the Cloud AI Companion API to be enabled before it can be used.
Next is an icon for cloud shell. Cloud shell is a free to use cloud hosted development environment that comes with pre-installed tooling for working with GCP services. Cloud shell provides you with a bash terminal, a code editor and 5Gb of disk space for building and deploying apps to GCP.
The bell icon shows you a list of notifications for events happening in your cloud environment. Notifications are displayed here when tasks are started, completed or in progress, such as when creating or destroying resources.
The question mark icon is the help menu. You can access GCP documentation, FAQs, tutorials and support from this menu.
Navigating the Resource Hierarchy
Resources in GCP are organized in to a hierarchy consisting of projects, folders, and organizations. Each node in the hierarchy may have only one parent. At the root of the hierarchy is the organization. This node in the hierarchy represents the organization as a whole and may have projects or folders as direct descendants in the hierarchy. Individual account users will not have an organization or folders in their resource hierarchy, only a collection of projects for organizing their resources.

A project is an organizational resource that allows you to group related GCP resources together. A project typically contains users and service accounts along with their associated permissions, API’s, a billing account and any required resources. You can use a project to create logical groupings of resources. For example, for a web application, you may opt to create a project to group the virtual machines, load balancers, network components and storage resources required to run the app.
Note that you cannot create resources without a project. When you first access GCP, a project is automatically created for you. You can use this project to get started, or you can create your own project and remove the default one.
A folder is another organizational resource that allows you to define logical groupings of projects. This can be useful, for example, if you need to separate GCP projects managed by different teams or departments in your organization.
At each level of the hierarchy, you can define Organization and IAM policies. IAM policies allow you to control user access to GCP resources, while organization polices allow you to restrict how those resources can be configured. Policies applied to the organization, will be applied across all resources. Policies applied at the folder level, will apply to all projects contained in the folder and all resources inside those projects. Policies applied at the project level will apply only to resources inside the project.
You can navigate the resource hierarchy from the toolbar at the top of the cloud console UI. There is a drop down list next to the navigation menu that will allow you to open any project that you have access to. You can also access the Resource Manager from here by selecting the folder and cog wheel icon at the top of the project list. The resource manager allows you to manage the resource hierarchy, including creating and deleting projects and folders as required. If this is your first time working with GCP you should have a single project, and depending on the type of account you chose, an organization.
Understanding Billing
When you sign up to GCP, a cloud billing account will be created for you. A billing account can be associated with zero or more GCP projects, and tracks all the costs incurred by any resources running in those projects. A billing account has payment details associated with it and will typically be charged on a monthly basis or when you reach some spending threshold. For larger businesses, invoiced billing is also available, but must be applied for.
Billing can be managed from the cloud console by opening the billing explorer from the navigation menu or search bar. From here, you can access any billing accounts in your organization. Selecting an account will open an overview of the billing account, including total costs accrued in the current period and top projects and services by cost. You can drill into each of these reports to see a more detailed breakdown of costs.

You can create budgets and alerts from the billing overview by opening the budgets and alerts page from the sidebar menu. From here, you can create a budget and define alerts that trigger after a certain percentage of the budget has been spent. The budget can be for a monthly, quarterly, annual or custom range, and can be scoped to the whole organization or specific projects, folders and resources. While this can be an effective way of keeping costs under control, bear in mind that there can be a delay between the moment a cost is incurred and the moment it appears on a billing report.
Note that before you can create and use resources inside a GCP project, the project must be associated with a billing account. You can configure billing for a project by selecting the project from the project selector in the tool bar and then opening the billing explorer and assigning a billing account. If you close a billing account, all resources in the associated projects will be stopped. Any data kept in these projects may also be deleted. While the free trial is active, you will not be charged unless you upgrade to a paid account.
Other Ways to Interact With Google Cloud
The cloud console is a useful tool for familiarizing yourself with the platform and performing manual ad-hoc tasks, but this is just one way of interacting with the underlying APIs that allow you to work with GCP tools and services. As you gain experience with GCP you will likely find that you need to automate many activities, such as deploying infrastructure or running jobs on a schedule. To do this, you’ll need to be able to interact with GCP programmatically. Below are some of the options available to you for interacting with the GCP API’s.
gcloud CLI
The gcloud CLI is a command line interface tool that you can use to manage most GCP services. You can use the gcloud CLI to write shell scripts to automate processes using a scripting language such as bash or powershell. The gcloud CLI consists of the gcloud command, through which most services can be accessed, plus additional components such as bq for managing BigQuery and kubectl for managing kubernetes clusters.
Client Libraries
The GCP Client libraries allow you to interact with GCP API’s from several popular programming languages, including Go, Java, C++, Node.js, Python and more. All client libraries follow the conventions of each supported language and provide detailed documentation on how to use them. You can use the client libraries to write automation scripts or fully fledged applications that integrate with GCP services.
Terraform
Terraform is an infrastructure as code tool that allows you to automate the deployment of infrastructure to the cloud. Terraform uses a language called Hashicorp Configuration Language (HCL) to describe resources and their configuration in a self-documenting manner. The terraform registry offers a GCP provider containing a library of resources that you can configure and deploy to GCP. At the time of writing, terraform is widely considered to be the industry standard for provisioning cloud infrastructure.
Summary
In this article we looked at how to get started with GCP.
- We looked at the sign up process, where you can either create a new google account to access GCP or sign in with an existing one.
- We explored how to get a free trial to experiment with GCP services using $300 of free credit by providing identification details.
- We accessed the cloud console and examined the toolbar, which contained the navigation menu, the project selector, the search box and some icons that provide access to useful tools such as duet AI and cloud shell.
- We examined the resource hierarchy. We learned that the organisation is the root node of the hierarchy and that the organization can have either projects or folders as descendants. We looked at projects, which are a way to logically group resources, and folders, which are a way to logically group projects.
- We looked at how billing works on GCP. We accessed the billing explorer from the navigation menu and then we examined the billing overview page. We saw how to set budgets and alerts to help control spending and we learned that a project must have a billing account associated with it before any resources can be created within it.


Leave a comment